If you are a testbank author or an instructor who wants to create a new testbank, first be sure that testbank editing is enabled. Then select "New Testbank" from the File menu.
When the file dialog appears, enter a filename for the new testbank. (TestGen testbank files use the file extension .BOK.) Set the location for where the testbank file will be saved—in the TestGen Testbanks folder or in another location on your hard drive.
After you name the testbank file, you need to select the number of levels for the testbank.
To determine the number of levels in the testbank, decide how the testbank table of contents will be organized. The most commonly used number of levels is 1, 2, or 3. A one-level testbank would have chapter title headings with questions below each chapter heading; there would be no subheadings. A two-level testbank would have chapter title headings with subheadings below to group the questions, usually by question type.
A two-level testbank has (level 1) headings for chapter titles and (level 2) subheadings for the divisions or question types in a chapter. (ID view is shown.)
|
Chapter 1 Analyzing Business and Technical Requirements Multiple Choice Questions cis 1.1-1 cis 1.1-2 True/False Questions cis 1.2-1 cis 1.2-2 Chapter 2 Planning a Framework for Security etc. |
A three-level testbank has chapter titles, followed by two levels of subheadings. This type of organization is often used for math testbanks where chapters are divided into sections that each have one or more objectives. (ID view is shown.)
|
Chapter 1 Introduction to Algebra Section 1.1 Variables Objective 1 math 1.1.1-1 math 1.1.1-2 Objective 2 math 1.1.2-1 math 1.1.2-2 Section 1.2 Expressions Objective 1 math 1.2.1-1 math 1.2.1-2 Objective 2 math 1.2.2-1 math 1.2.2-2 Chapter 2 Solving Linear Equations etc. |
Click "Create New Testbank" to confirm the number of levels and proceed to the Testbank Setup dialog.
Note: The number of levels for a testbank cannot be changed once a testbank is created.
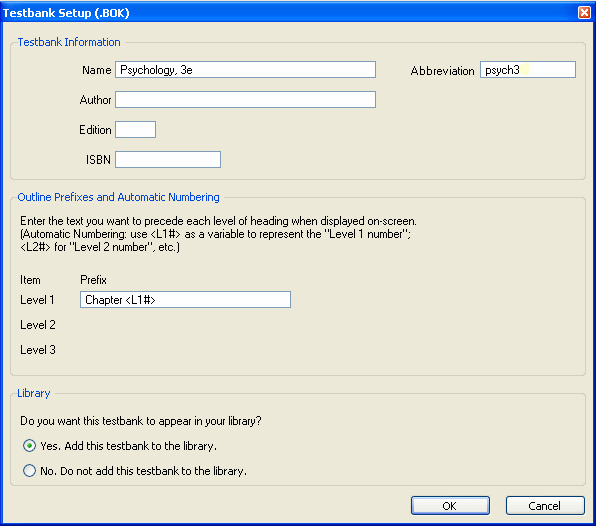
After you choose the number of levels for the testbank, the Testbank Setup dialog opens. You can reopen this dialog any time you are editing a testbank by selecting "Testbank Setup" from the View menu. In this dialog, you enter the testbank information and set up automatic numbering and prefixes.
In the Name box, enter the testbank title, which will appear in the title bar at the top of the testbank window. In the Abbreviation field, enter an abbreviation for the textbook title that will be used as part of the unique question ID assigned to each question in the testbank. Use eight or fewer characters for the testbank abbreviation.
TestGen uses the testbank abbreviation and the number of the levels to create the unique ID for each question. For example, the question ID "law 1.1-5" refers to question 5 in section 1 of chapter 1 of the testbank abbreviated as "law."
Note: Although the first number in a question ID usually matches the number of a textbook chapter, the number could be different from the textbook chapter number if additional "chapter" headings, such those for appendices or supplementary chapters, are inserted between standard numbered chapters.
The use of the author, edition number, and ISBN boxes is optional.
This section of the setup window lists the number of levels in the testbank. Each level can be set to display default text and automatic numbering before titles or subheadings. For example, the default text in the Prefix box might be "Chapter," "Unit," or "Module" in front of the automatic number for each main heading in the testbank. Type the text you want to precede each level of heading, or remove the default text from the Prefix box.
To use automatic numbering, use <L1#> as a placeholder to represent the "Level 1 number", <L2#> to represent the "Level 2 number", and so on. Setting the Level 1 prefix as "Chapter <L1#>" automatically prints the word "Chapter" and sequentially numbered chapter numbers in front of chapter titles. Setting the Level 2 prefix as "<L1#>.<L2#>" automatically numbers the subheadings as 1.1, 1.2, and so on. If you add, delete, or rearrange chapters or sections, the automatic sequential numbering changes based on the new table of contents or outline.
In rare instances, you may need to begin numbering chapter titles or sections with a number other than 1. To adjust the starting number, insert "+" or "-" and a number after the # sign inside the brackets. For example, to make the first chapter "Chapter 0" instead of "Chapter 1," enter "Chapter <L1# -1>" for the Level 1 prefix in the Testbank Setup dialog.
Note: Do not type the chapter or section titles in the Prefix boxes, because you will enter them in the testbank window, after the Testbank Setup dialog closes.
In some cases, automatic numbering may be unsuitable for a particular testbank. In these cases, the prefix and automatic numbering can be removed from the prefix field, and nonstandard numbering can be included as part of the chapter or section titles.
Select Yes or No to indicate whether or not you want the new testbank to be listed in the Testbank Library. If you choose Yes, the testbank file resides on disk at the location where you created it, and the testbank title appears in the Testbank Library for easy opening. If you choose No, the testbank file resides on disk at the location you specified when you created the new file, but the book title is not listed in the Testbank Library.
When you click OK on the Testbank Setup dialog, the new testbank window opens. The testbank window contains a heading for each level you defined in the Testbank Setup dialog, including prefixes and numbers. Click the plus (+) sign at the left of main headings to display subheadings. To edit any of the main headings or subheadings, simply click on the title you want to edit, and then click in the text editing field. Modify the text as needed.
The first question in a new testbank is a "dummy" question that serves as a placeholder until you add text to it. Click in the question field and type the question. Type the answer or answer choices, depending on which type of question you want. To change the question to another question type, select the question by clicking just to the left of the question number so the background changes color. Then select "Change Question Type" from the Question menu. Select the new question type from the drop-down menu and click OK. Continue to edit the question, answer(s), and question properties as needed.
For information about adding more questions, see the "Modifying Testbanks" section.
For information about adding additional chapters or sections within a chapter, see the "Modifying Testbanks" section of Editing Testbanks.